Setting up CODESYS OPC UA (SP17)
Requirements
- Modbus & OPC Edition or Ultimate Edition
- CODESYS v3.5 SP17 (works with demo version)
Resolving Conflicts with the Local Discovery Server (LDS)
If a Local Discovery Server (LDS) is running on your system, you may need to deactivate it to connect Factory I/O to the CODESYS OPC UA Server. See more here
This tutorial shows how to use CODESYS together with Factory I/O through OPC UA. By following this sample you will create a new CODESYS project, configure it to work with Factory I/O and program the CODESYS Control Win (SoftPlc) to control the Sorting by Height (Advanced) scene.
The sample code used in this tutorial is based on the solutions found in the book Industrial Automation Practices.
Creating the Project
-
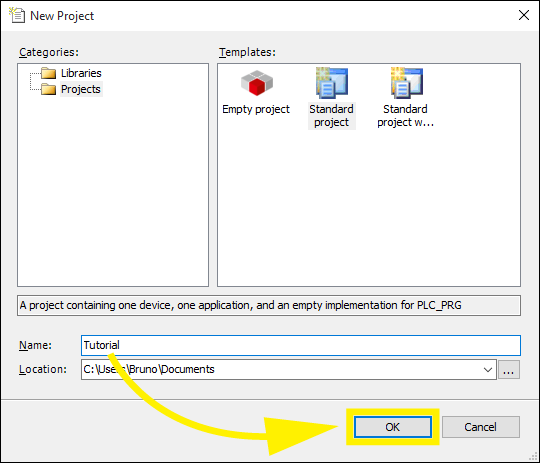
Start CODESYS and create a new project.
-
Select Standard project from the Templates list and choose a name for the project (e.g. Tutorial). Click on OK.
-
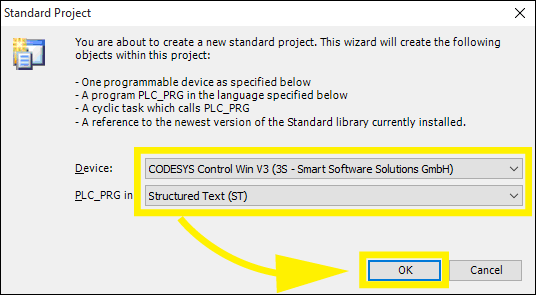
On the Standard Project window select the Device CODESYS Control Win V3 (3S - Smart Software Solutions GmbH) and Structured Text (ST) for the PLC_PRG. Click on OK.
-
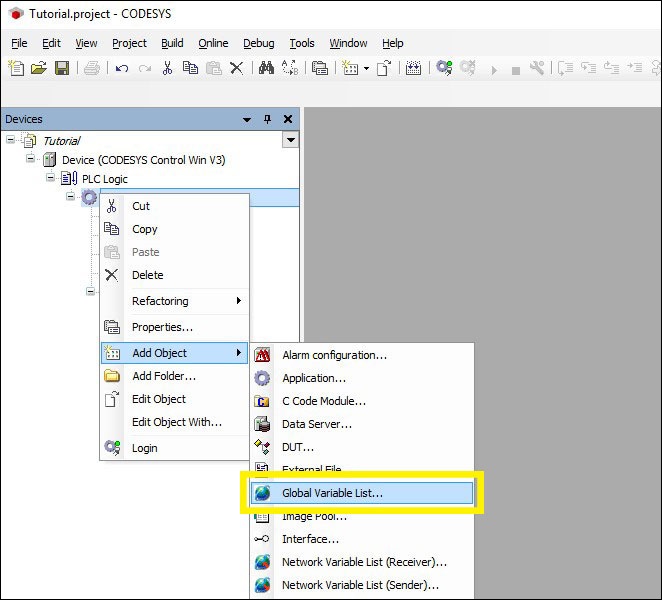
Right-click on Application and select Add Object > Global variable List.... Type FIO as the list name, click on Add.
-
Open the FIO list by Double Left-clicking on it and copy and paste the following global variables. These variables will be used to exchange data between Factory I/O and CODESYS thought OPC UA (these are the I/O points).
VAR_GLOBAL
    iAtEntry        : BOOL;
    iLowBox         : BOOL;
    iHighBox        : BOOL;
    iAtTurnEntry    : BOOL;
    iAtLoadPos      : BOOL;
    iAtUnloadPos    : BOOL;
    iAtFront        : BOOL;
    iAtRightEntry   : BOOL;
    iAtLeftEntry    : BOOL;
    iAtRightExit    : BOOL;
    iAtLeftExit     : BOOL;

    oFeederConveyor : BOOL;
    oEntryConveyor  : BOOL;
    oLoad           : BOOL;
    oUnload         : BOOL;
    oTurn           : BOOL;
    oLeftConveyor   : BOOL;
    oRightConveyor  : BOOL;
END_VAR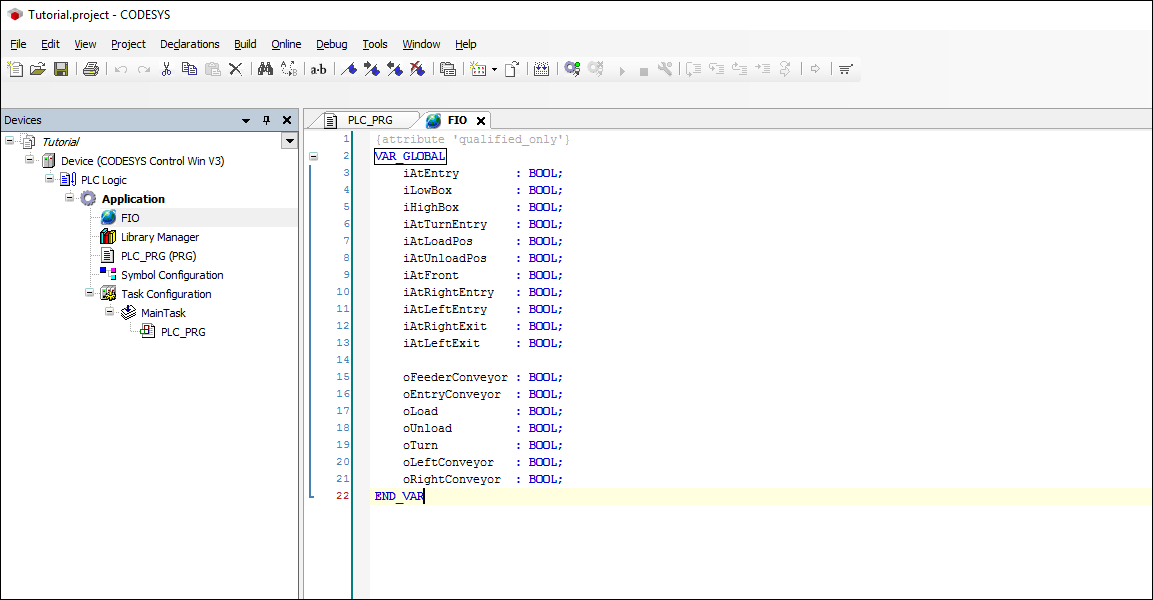
-
On the Devices tree Double Left-click on PLC_PRG (PRG) and copy and paste the following variables. These are the variables you will be using in your program.
PROGRAM PLC_PRG
VAR
    F_AtEntry           : F_TRIG;
    F_AtTurnEntry       : F_TRIG;
    F_AtRightEntry      : F_TRIG;
    F_AtLeftEntry       : F_TRIG;
    F_AtRightExit       : F_TRIG;
    F_AtLeftExit        : F_TRIG;

    Pallet_on_left      : BOOL := FALSE;
    Pallet_on_right     : BOOL := FALSE;
    Idle                : BOOL := TRUE;
    Charging            : BOOL := FALSE;
    Turns_charged       : BOOL := FALSE;
    Discharging         : BOOL := FALSE;
    Turns_Discharged    : BOOL := FALSE;
    Turntable_busy      : BOOL := FALSE;
    Discharge_direction : BOOL := FALSE;
    Entry_busy          : BOOL := FALSE;
    Pallet_on_entry     : BOOL := FALSE;
    Count               : WORD := 16#8000;
END_VAR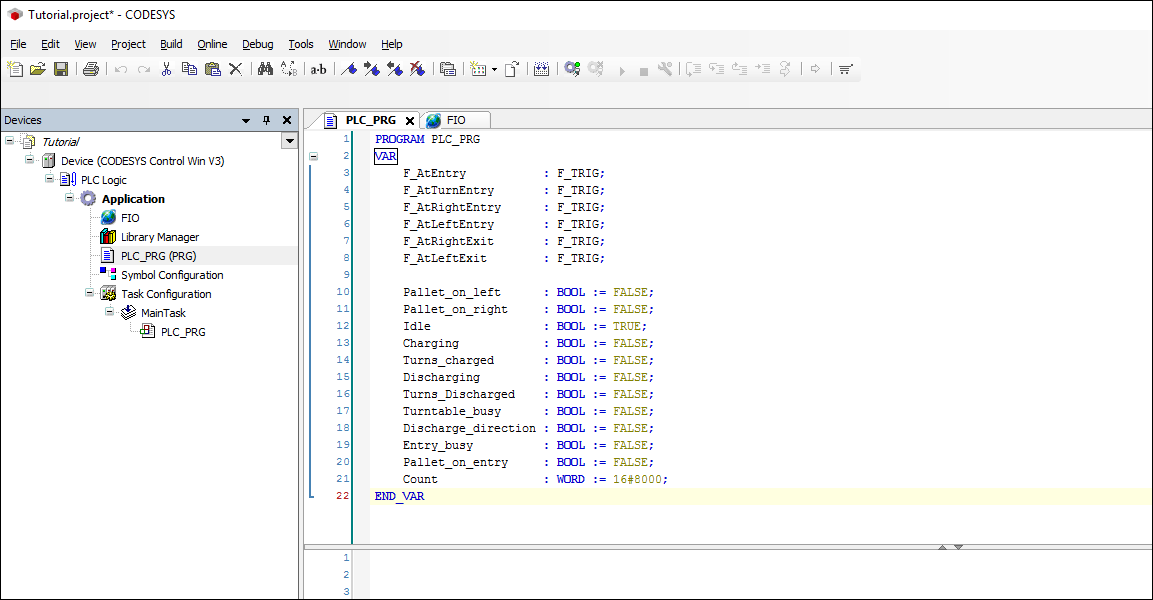
-
Now, copy and paste the following code. This is the program that will control the Sorting by Height (Advanced) scene.
F_AtEntry(CLK := FIO.iAtEntry);
F_AtTurnEntry(CLK := FIO.iAtTurnEntry);
F_AtRightEntry(CLK := FIO.iAtRightEntry);
F_AtLeftEntry(CLK := FIO.iAtLeftEntry);     (* A pallet abandons the turntable, being charged onto the left exit conveyer *)
F_AtRightExit(CLK := FIO.iAtRightExit);
F_AtLeftExit(CLK := FIO.iAtLeftExit);       (* A pallet abandons the left exit conveyer *)

(**** LEFT EXIT CONVEYER CONTROL ****)
(* Pallet_on_left represents the state of the left exit conveyer: if it carries a pallet, then Pallet_on_left = TRUE *)

IF F_AtLeftExit.Q THEN                      (* When a pallet abandons the conveyer *)
    Pallet_on_left := FALSE;                (* Reset Pallet_on_left *)
END_IF;

IF FIO.iAtLeftEntry THEN                    (* When there’s a pallet at the entry of the conveyer *)
    Pallet_on_left := TRUE;                 (* Set Pallet_on_left *)
END_IF;

FIO.oLeftConveyor := Pallet_on_left;        (* Left exit conveyer runs for Pallet_on_left = TRUE *)

(**** RIGHT EXIT CONVEYER CONTROL ****)

IF F_AtRightExit.Q THEN
    Pallet_on_right := FALSE;
END_IF;

IF FIO.iAtRightEntry THEN
    Pallet_on_right := TRUE;
END_IF;

FIO.oRightConveyor := Pallet_on_right;

(**** TURNTABLE CONTROL ****)

IF Idle AND FIO.iAtTurnEntry THEN
    Idle := FALSE;
    Charging := TRUE;
END_IF;

IF Charging AND FIO.iAtFront THEN
    Charging := FALSE;
    Turns_charged := TRUE;
END_IF;

IF Turns_charged AND FIO.iAtUnloadPos THEN
    Turns_charged := FALSE;
    Discharging := TRUE;
END_IF;

(* The turntable discharges now onto both conveyers. Thus: *)

IF Discharging AND (F_AtRightEntry.Q OR F_AtLeftEntry.Q) THEN
    Discharging := FALSE;
    Turns_Discharged := TRUE;
END_IF;

IF Turns_Discharged AND FIO.iAtLoadPos THEN
    Turns_Discharged := FALSE;
    Idle := TRUE;
END_IF;

IF F_AtTurnEntry.Q THEN
    Turntable_busy := TRUE;
END_IF;

IF Idle THEN
    Turntable_busy := FALSE;
END_IF;

(* Computing control outputs according to the current state of the turntable and the direction of the discharge *)
FIO.oLoad := Charging OR Discharging AND Discharge_direction;

(* oUnload is TRUE if the discharge is onto the left conveyer *)
FIO.oUnload := Discharging AND NOT Discharge_direction;

(* oTurn is TRUE if the discharge is onto the right conveyer *)
FIO.oTurn := Turns_charged OR Discharging;

(**** ENTRY CONVEYER CONTROL ****)
IF F_AtEntry.Q THEN
    Count := ROL (Count,1);
    IF (Count = WORD#16#2) THEN
        Entry_busy := TRUE;
    END_IF;
END_IF;

IF F_AtTurnEntry.Q THEN
    (** Defining the direction of the discharge: the direction of the discharge changes every time a pallet is
    discharged from the entry conveyer onto the turntable. If Discharge_direction = FALSE, then the discharge is onto the right conveyer **)
    Discharge_direction := NOT Discharge_direction;

    Entry_busy := FALSE;
    Count := ROR(Count,1);

    IF (Count = WORD#16#8000) THEN
        Pallet_on_entry := FALSE;
    END_IF;
END_IF;

IF FIO.iAtEntry THEN
    Pallet_on_entry := TRUE;
END_IF;

FIO.oEntryConveyor := Pallet_on_entry AND (NOT Turntable_busy OR NOT FIO.iAtTurnEntry);

(**** FEEDING CONVEYER CONTROL ****)
FIO.oFeederConveyor := NOT Entry_busy OR NOT FIO.iAtEntry;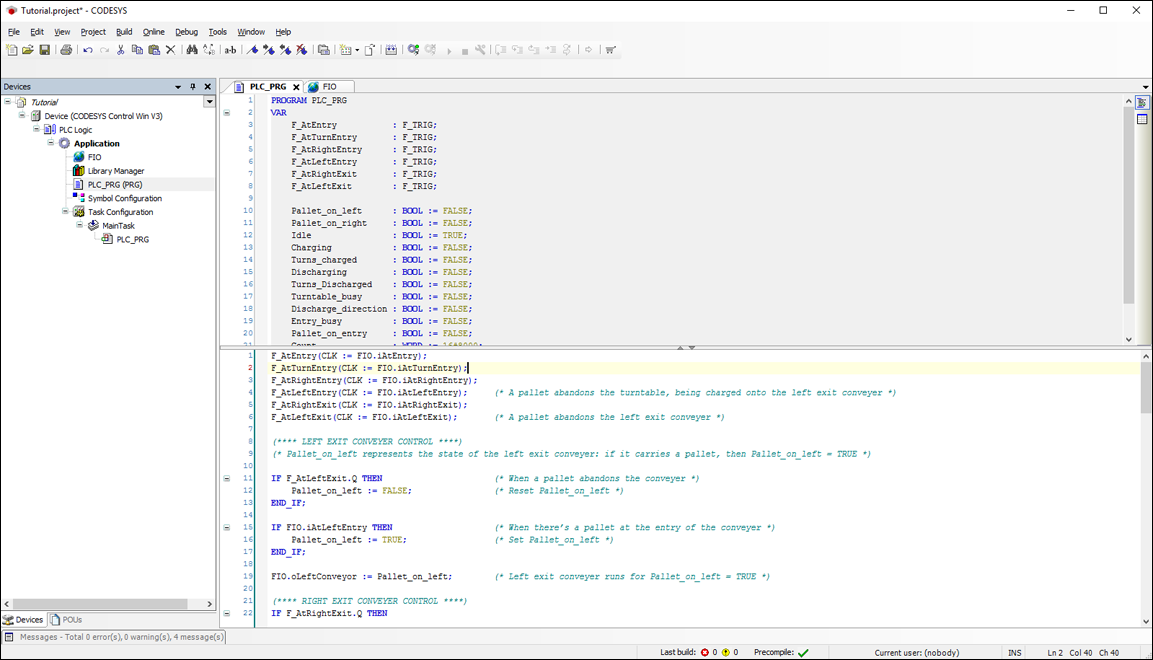
-
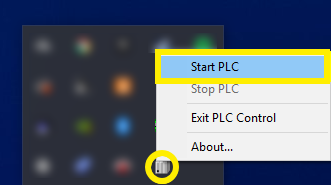
Right-click on CODESYS Control Win PLC icon (Systray) and select Start PLC.
-
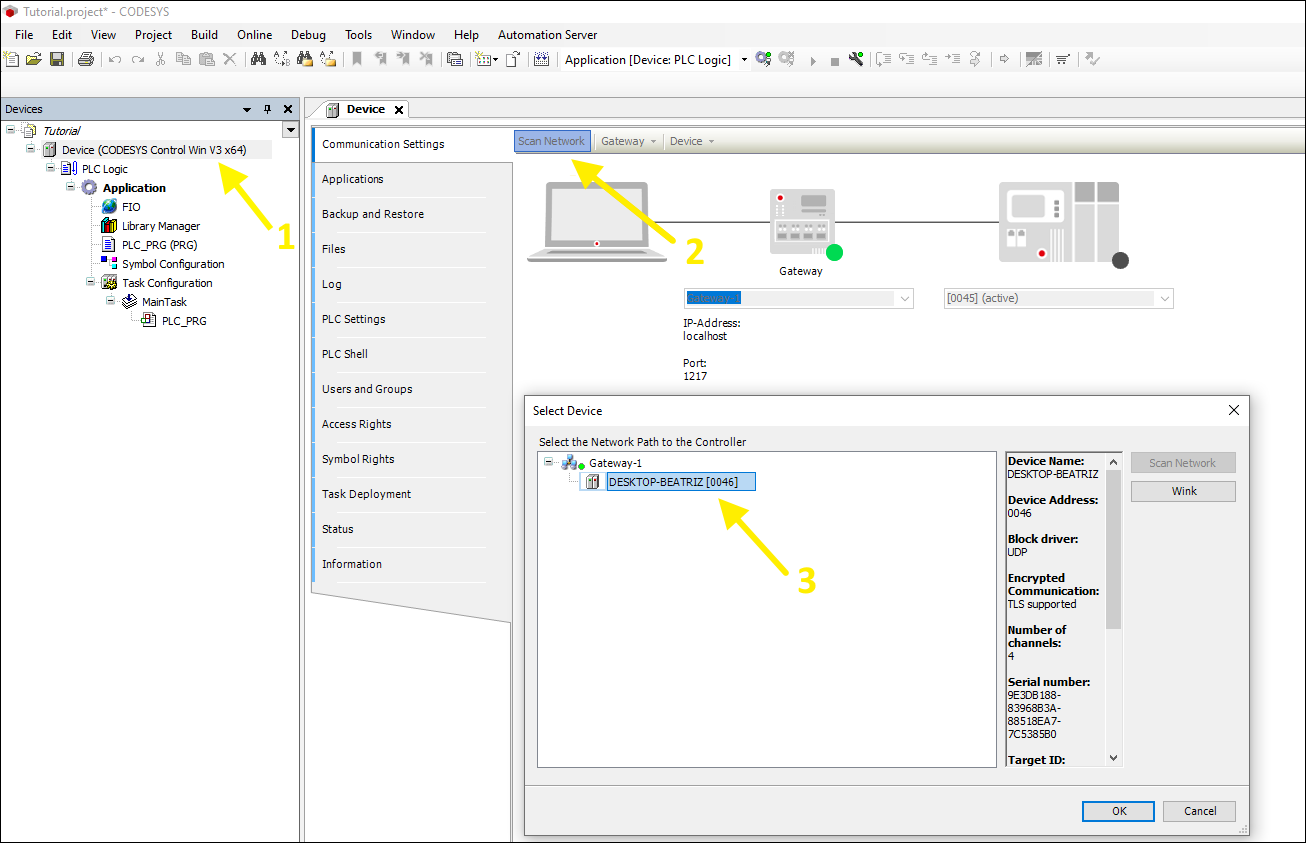
Get back to CODESYS and on the project tree, Double Left-click on Device (CODESYS Control Win V3) and then on Communication Settings. Now, click on Scan network... Select the network path to the controller and click on OK. Note that the device name can be changed by clicking on Device > Rename active device.
-
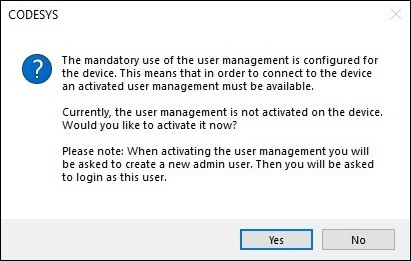
After selecting your device, CODESYS will prompt you regarding the mandatory use of the user management, click on Yes.
-
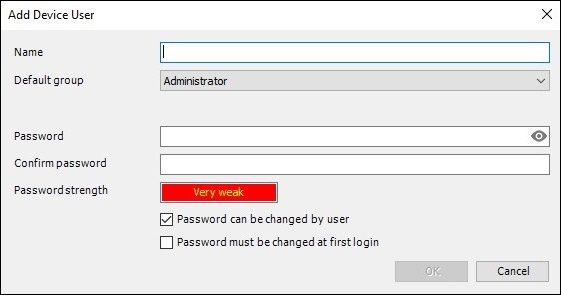
Now, CODESYS will require you to create a Device User. Define a Name and a Password and click OK.
-
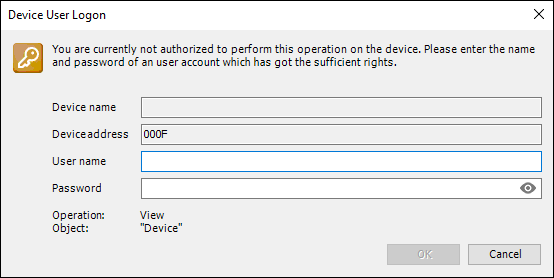
Next, you will have to Logon using the credentials defined in the previous step.
-
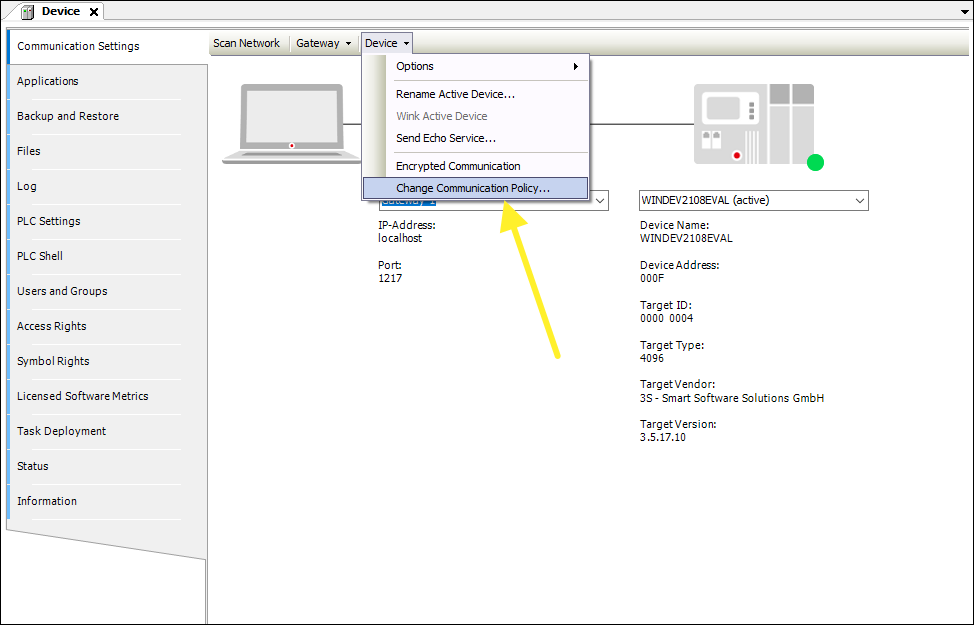
In order for CODESYS to communicate with Factory I/O you have to disable the Device User Management. For that, Double Left-click on Device (CODESYS Control Win V3) and then on Communication Settings. Now, click on Device > Change Communication Policy...
-
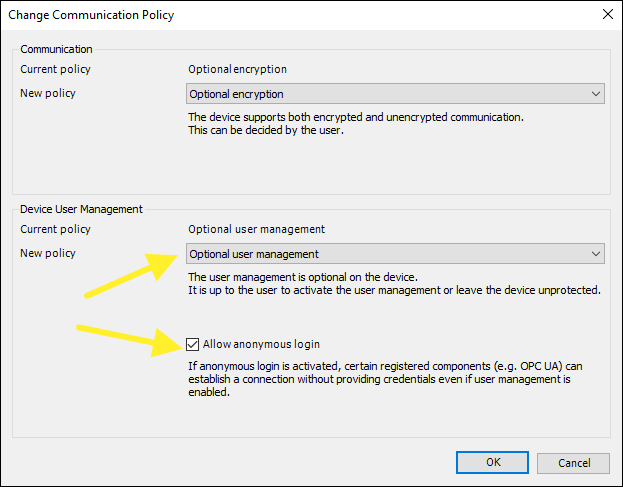
In the Device User Management section, in the drop-down list, select Optional user management and check the Allow anonymous login option.
-
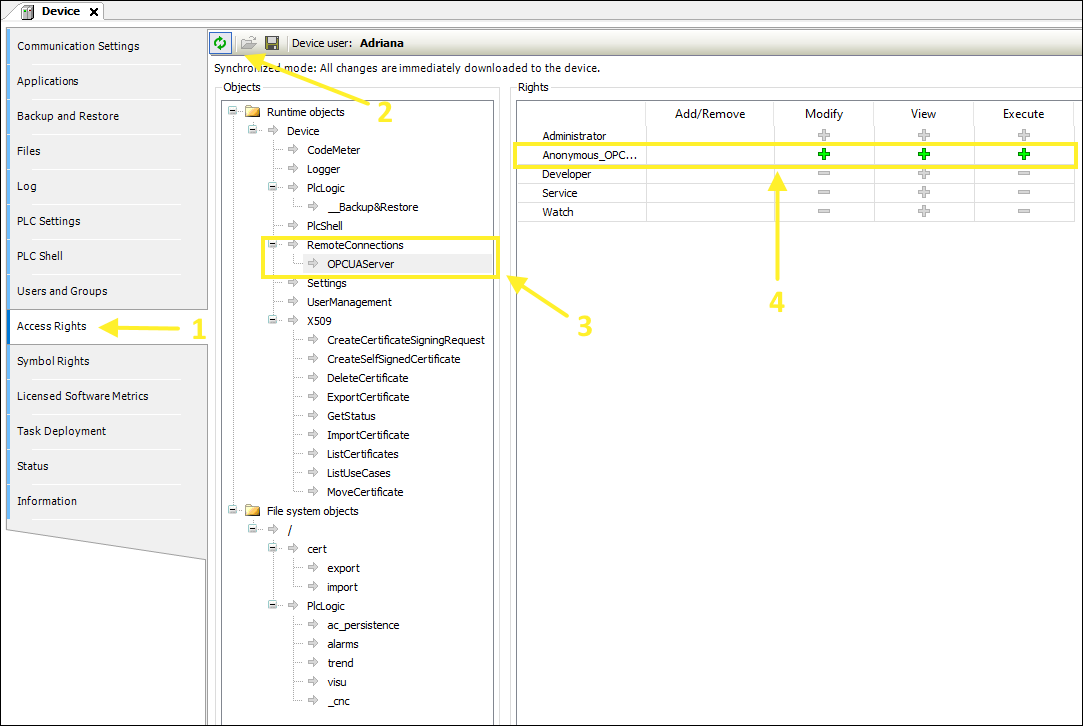
Click on Access Rights (1) and next on the Synchronization button (2). Next, open the RemoteConnections (3) and select the OPCUAServer. On the Anonymous_OPCUAServer (4) allow the Modify, View and Execute by clicking on each one of them.
-
In the toolbar click on Build > Build (F11) to download the program to SoftPLC.
-
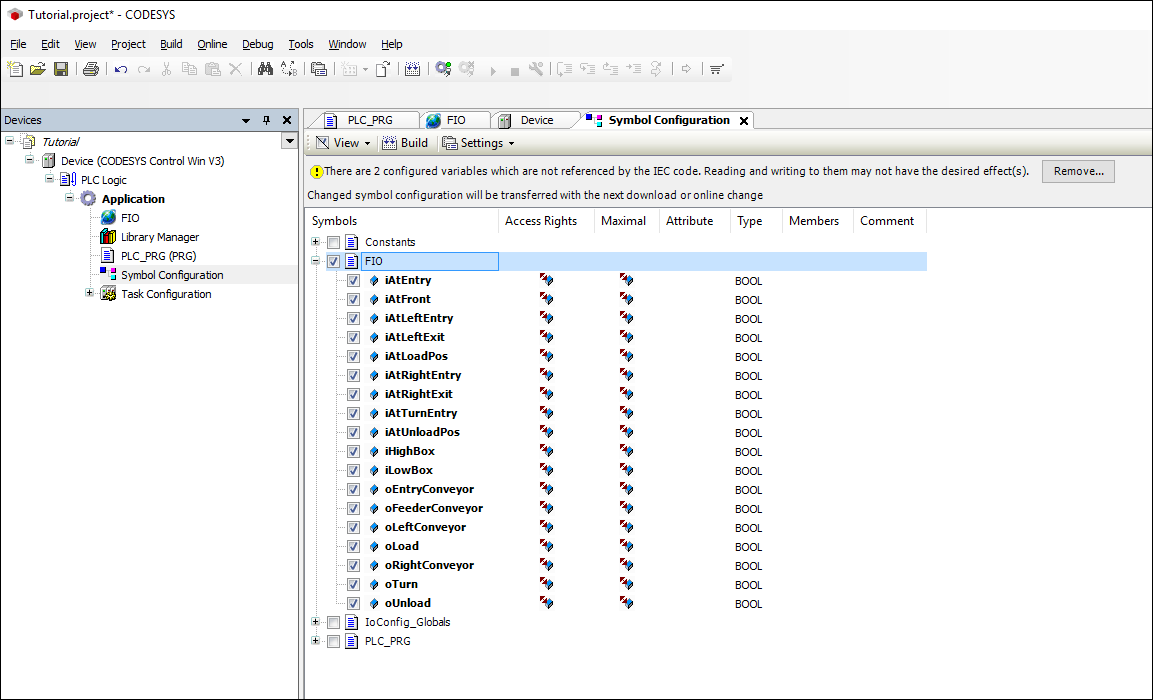
Now, Right-click on Application and select Add Object > Symbol Configuration. On the Add Symbol Configuration window check Support OPC UA features, next click on Add. Now, check the FIO symbols (see image below) and click on Build.
-
Next, click on Online > Login (Alt+F8). When prompted to download the program to the PLC, click on Yes.
-
Finally, click on Debug > Start (F5).
Setting up Factory I/O
-
Open the Sorting by Height (Advanced) scene and click on File > Driver Configuration.
-
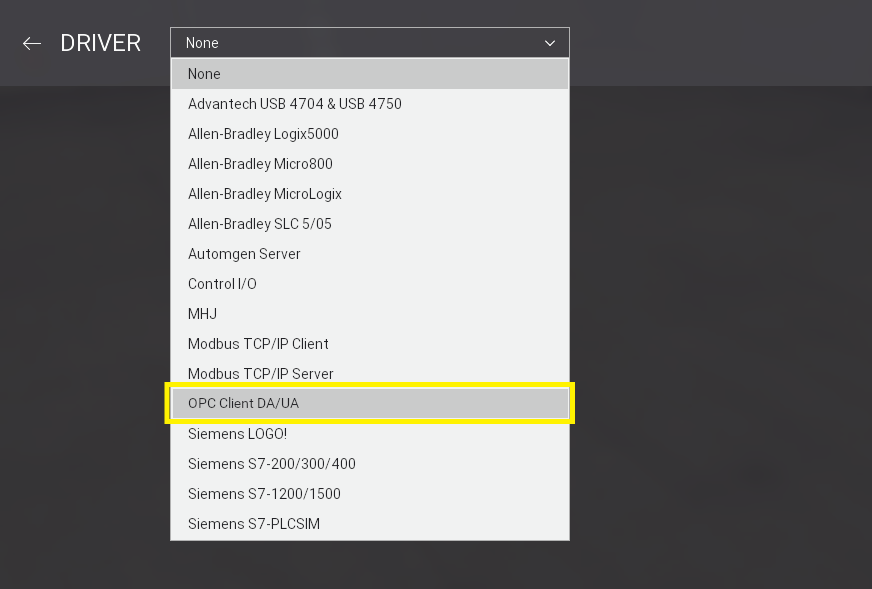
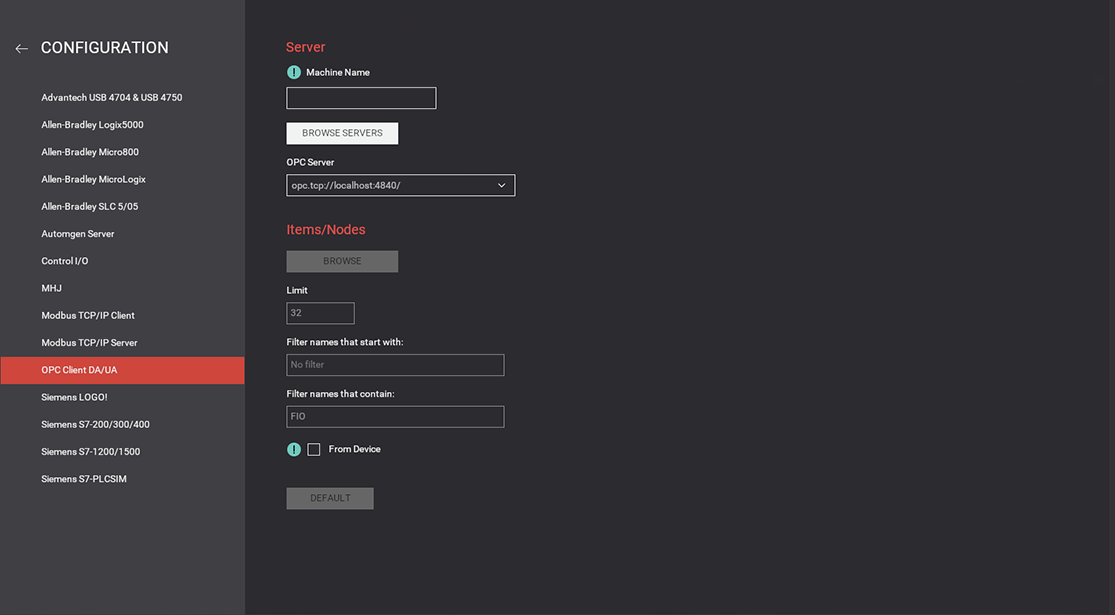
Select OPC Client DA/UA from the Driver list and click on CONFIGURATION.
-
Type opc.tcp://localhost:4840 on the OPC Server input field and press Enter to connect. Set "FIO" as the contain filter (see image below), this will retrieve nodes containing "FIO" (the Global Variable List defined in CODESYS). Next, click on BROWSE.
-
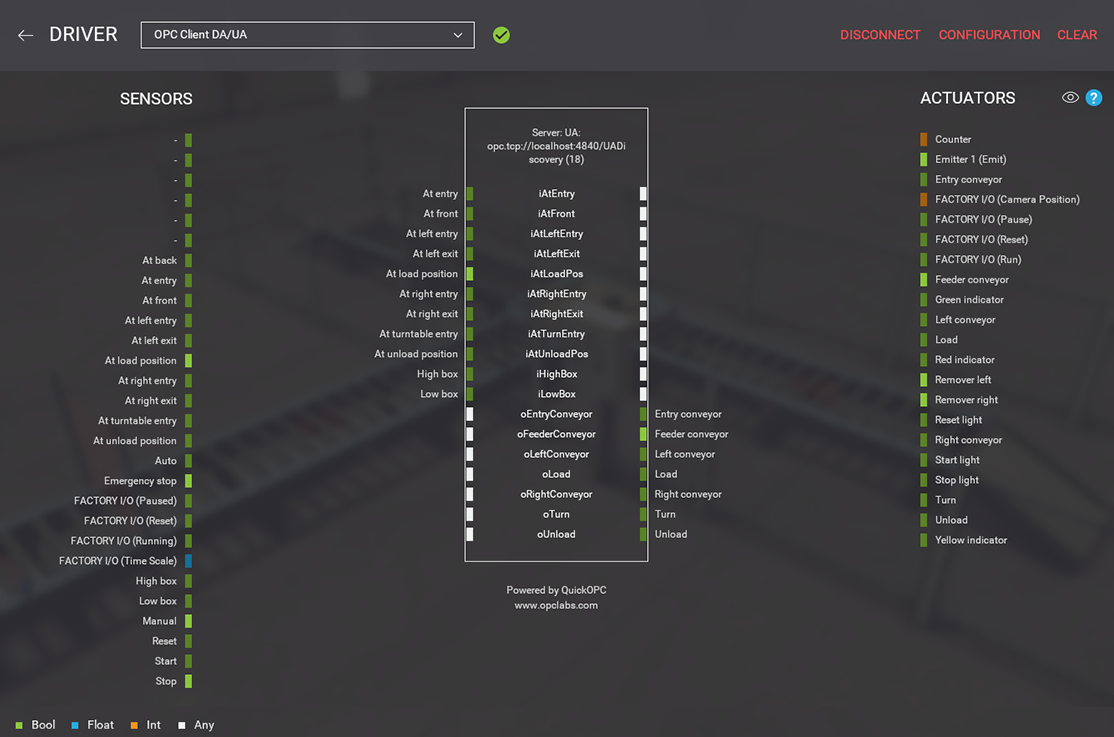
Map the sensors and actuators tags as shown in the image below.
-
Finally, close the Driver window and start the simulation (press F5).
Resolving Conflicts with the Local Discovery Server (LDS)
If a Local Discovery Server (LDS) is running on your system, you may need to deactivate it to connect Factory I/O to the CODESYS OPC UA Server.
By default, CODESYS uses port 4840 for OPC UA communication. However, this same port is also used by OPC UA Local Discovery Servers (LDS). As a result, when Factory I/O attempts to connect to CODESYS via port 4840, it may instead connect to the LDS service running on your computer. Since the LDS is not an OPC UA server, the connection will fail.
To resolve this issue, disable or uninstall the LDS service on your system:
Open the Services Manager:
-
Start > Control Panel > System and Security > Administrative Tools > Services
-
Locate the service named “OPC UA Local Discovery Server”.
-
Right-click the service and select Stop. Additionally, you should set Sartup type to Manual (Properties) so this problem does not happen again when you reboot your computer.
-
Confirm the change by clicking OK.